

AziothubDeviceStreaming: How to use the Updated UWP-Xaml app
azure azure iothub csharp uwp dnetcore device service streaming
The previous posts in this series looked in detail at the AziothubDeviceStreaming library and the UWP-Xal app that exercises the library. You can get a copy of the UWP-Xaml app by downloading the repository and building the app. Also, the UWP app is now being published in the AppStore as AzDeviceStreamingApp. This blog covers how to use it.
App Store Link (Now available)
The current version of the repository: djaus2/AziothubDeviceStreaming
Background
Azure IoT Hub Device Streaming, although in Preview, is a cool technology. It enables an IoT device app to receive messages from an app on another system (the service: for example a user app) and for device to respond by sending back a message to the service. An Azure IoT Hub acts as the intermediary in the communications. No modules are needed to be installed in the hub. The functionality is implemented by calls to the IoT Hub SDK by both the device and service apps.
The library AziothubDeviceStreaming refactors the Azure Device Streaming functionality as demonstrated in the IoT Hub SDK Sample, Echo. The GitHub repository, djaus2/AziothubDeviceStreaming contains the .Net Standard class version of the library. Earlier versions of the repository also contain .Net Core and UWP versions of the library, all using the same refactored source code.. The .Net Standard version though can be used in all .Net SDK contexts. The repository contains a number of sample applications that demonstrate the use of the library as standalone console apps, implemented using the various .Net SDK types (Core, Standard and UWP). Each of these function as one end of the pipe, the service or the device. Typically, an IoT device will perform the device functionality, for example collecting data from sensors. A user app will perform the service end of the pipe. Device Streaming permits a simple method for a user app to get data from a remote IoT device. To run an instance of Device Streaming you install an IoT Hub and run a device and a stream app using the hub’s connection data. The repository also contains a UWP-XAML app, as discussed here.
Default Functionality
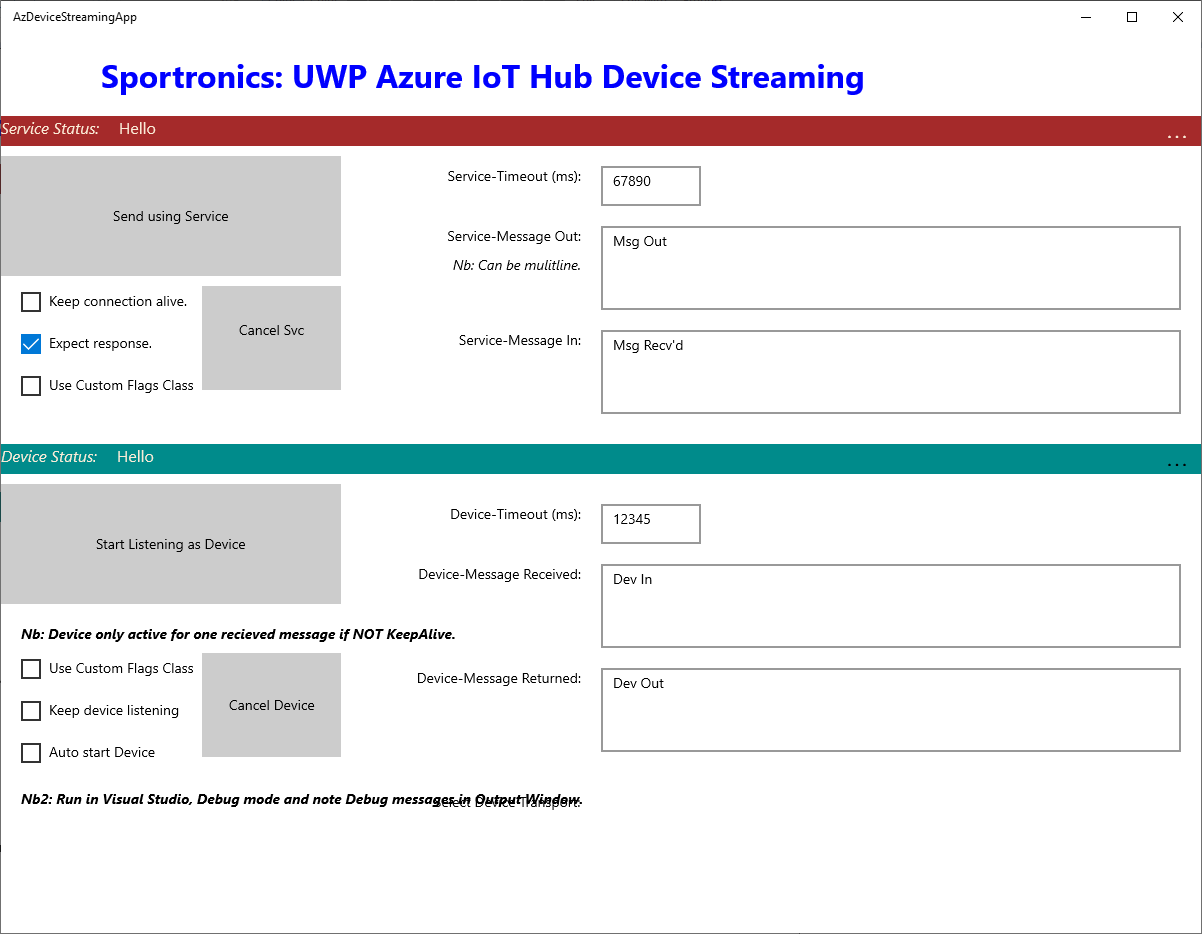
To test the functionality of the library, there is a UWP-XAML app (see image below) that can act as both the Device and the Service ends of the pipe. In default mode, a user enters a message in Service-Message-Out and starts its transmission from the Service, press [Send Using Service], which causes a service socket to be created that awaits a connection from a Device. When a Device is instantiated by pressing [Start Listening as Device], it creates a socket when the connection from the service is established and the message reception occurs, with the message displayed in Device-Message-Received. The transmission go-between the service and the device is an Azure IoT Hub for which the connection information is configured in the app. The Device then processes the received message, displays this in Device-Message-Returned and sends it back to the service. The Service receives the message, displays it and closes the socket. Once the device completes its transmission, the device will close its socket. The user can then send subsequent messages, with new instances of the sockets created for the duration of the transmissions and receptions.
Whilst Windows Networking Sockets are used for the service to the IoT Hub communications, the library supports a range of transports between the device and the IoT Hub library, the default being MQTT. The UWP-Xaml app displays the list of available transports in the device section as a menu. The user can make this selection prior to the socket being created at the device end. The transport is a parameter to the device’s socket instantiation.
The Updated UWP-XAML Test App
Using the App
- Get and install the app either via the repository or from the App Store (Now available).
- Get an Azure Subscription. You can get a free one here
- Create an IoTHub Here’s howto
- Make sure its location is Central-US, the only one that currently supports Devicde Streaming
- A Free one is sufficient, Basic isn’t
- Only do down to and including Shared access policies
- Don’t do Add a shared access policy
- Get the IoTHubOwner Primary connection string (Click on IoTHubOwner and click on the connection string to copy it).
- No need to create a Device yet. We do that in the app.
- Run the app. Notice the two app bars, one for Service and one for Device. Checkout their menus on right.
- From the Service menu select Add new Device to IoTHub.
- Paste the connection string and give the Device a name (must be unique for you)
- Press Update
- Check its creation from Service-SetConnection Details. A Device Connection string should have been created.
- Set the Device transport from the Device menu MQTT is the default.
- Set the Device processing. Uppercasing is the default.
- Click on Send Using Service” and *Start Listening as Device. Order doesn’t matter.
- The sent message should be returned uppercased. Try other messages.
- Try the Simulated Environment Device mode. Send temp,press or humid.
- It only sends back the same values. A future app update will use a RPI etc for real values.
Examine the options as per the previous blog and try those settings with the app.
Device Settings
- Timeout
- KeepDeviceListening: If set, once a message has been received and processed by the device and the connection is closed, the device will continue to listen for more connections. Otherwise it stops listening.
- AutoStart: This tells the Device app that when it first starts, immediately go into to listening for connections mode.
Service Settings
- Timeout
- devKeepListening 0-false, 1-true, 2-Don’t send(default) Send KeepListening after disconnection flag to device. (In Service menu)
- devAutoStart 0-false, 1-true, 2-Don’t send(default) Send AutoStart flag to device. (In Service Menu)
- keepAlive A flag. Option for the service to tell the device to stay connected after this message is received so as to be ready to accept more messages from the service.
- responseExpected A flag. If true, then Device to send the result of the onRecvdTextD() back to the service.
Other things to try.
- Run the app on two devices making one the Device and one the Service
- As above but geographically distinct locations.
- Get the repository and build the device apps to run on IoT-Core.
Coming
- Some addins that run on actual IoT-Core devices to interact with hardware.
Enjoy! Please provide feedback below.
| Topic | Subtopic | |
| This Category Links | ||
| Category: | Azure Device Streaming Index: | Azure Device Streaming |
| Next: > | AziothubDeviceStreaming | App Functionality Checklist |
| < Prev: | AziothubDeviceStreaming | Under the hood-The API Options |


