

Soft-ata: A Simple Firmata with .NET
softata firmata arduino csharp
An Arduino app LIKE Firmata for RPI Pico W running Arduino. Includes a .NET package so that you can write your own client in C#. Console app included with Blazor and MAUI apps coming soon.
Soft-ata rather than firm-ata!
Latest
V1.10: Serial1 & Serial2 byte/char read/write added, include demo code.
Code On GitHub
The Target
The Grove landscape provides a simple way of connecting various devices to a microprocessor system such as the Arduino Uno. This is is simplified by having a Base Shield V2 that sits atop of the Uno into which various Grove devices can be directly plugged without worrying about wire polarity, signals etc. Whilst Ethernet shields work OK with the Uno, WiFi shields are problematic. The RPi Pico (and Pico W) can be configured to run as an Arduino device where WiFi and Bluetooth run out of the box. There is also a RPi Pico Grove shield for the Pico making it simple to implement the hardware for an Arduino system with WiFi (and/or) Bluetooth.
Tap and rotate phone to enlarge.
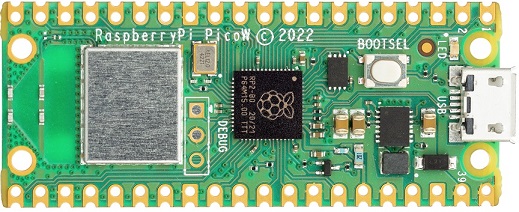
RPi Pico W

Tap and rotate phone to enlarge.
Grove RPi Pico Shield
So the target system is a RPi Pico W with Arduino installed, using WiFi connectivity and using Grove devices attached via a Grove Pico Shield.
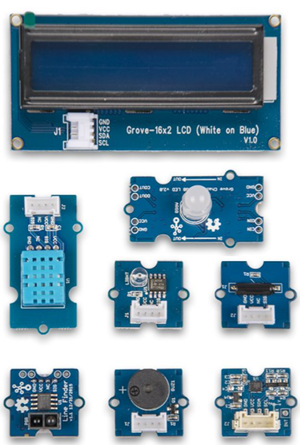
Tap and rotate phone to enlarge.
Grove plugable devices
Background
I wanted to use a RPI Pico W with Arduino installed controlled by .NET apps. Drilling deeper, I wanted to make the Pico coding available to my grandkids with a Blockly style UI as per CodeCraft. There is also BlocklyDuino. But I found that with both, whilst the Arduino Uno is supported there, there is no support for the Pico. I then found NETCoreBlockly on GitHub (as discussed by Scott Hanselman) for general .NET Blockly programming and looked for a way to extend it for the Pico. So the idea here is to create a .NET package that interfaces to the Pico over WiFi or Bluetooth that then can be integrated into a Blazor app running the .NET Blockly.
Tap and rotate phone to enlarge.
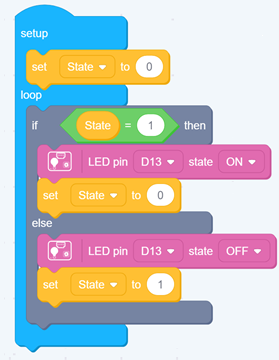
CodeCraft
Tap and rotate phone to enlarge.
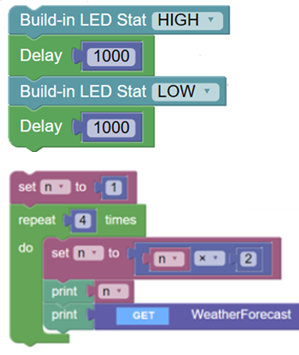
BlocklyDuino and NetCoreBlockly
After some consideration I had a back-to-the-future moment. What about Firmata? But alas …
Firmata
Firmata is a protocol for communicating with microcontrollers from software on a host computer. The protocol can be implemented in firmware on any microcontroller architecture as well as software on any host computer software package. From
So if there a Firmata app running on a device, a host computrer can interact directly with the device’s hardware through a standard protocol over Serial, Ethernet (Wired or WiFi) or Bluetooth. THe Firmata protocol can be viewed in the first link below. There are various implementations of it for various devices:
- Firmata Protocol Documentation
- Firmata for Arduino
- ConfigurableFirmata
- And there is the web app Firmata Builder
There are also Firmata Client libraries for use on the host end.
I could get the ConfigurableFirmata running on a RPi Pico W over WiFi. The.NET client libraries were quite old and used a Serial connection. Using a .NET Tcpip Client, I found that the functionality I couldget working with interactively was limited. So I decided to build my own “Firmata”, hence Soft-ata.
Soft-ata Projects
- Softata: The Arduino RPI Pico Softata app
- SoftataLib: The. NET Library
- SoftataConsole: A simple .NET Console demo app
RPi Pico W Arduino
This requires a setup as per previous repositories as well as in some blog posts:
- RPI Pico W GPS Bluetooth and Azure IoT Hub
- Azure IoT Hub Arduino Raspberry Pi Pico with Telemetry
- RPI-Pico-Arduino-AzSDK: Context
Repository Status
- Version 1.20
- Serial1 and Serial2 implemented for byte and char read/writes
- SoftataLib.Serial.serialSetup(byte pin, int baud, byte serialportNo)
- pin is the Tx pin (Rx = Tx+1), serialportNo = 1 or 2
- SoftataLib.Serial.serialGetChar(byte serialportNo)
- SoftataLib.Serial.serialWriteChar(byte serialportNo, char value)
- SoftataLib.Serial.serialGetByte(byte serialportNo)
- SoftataLib.Serial.serialWriteByte(byte serialportNo, byte value)
- SoftataLib.Serial.serialSetup(byte pin, int baud, byte serialportNo)
- Communication between client and Pico made more robust:
- Length of byte array included as first byte rather than read until \n
- Serial1 and Serial2 implemented for byte and char read/writes
- Version 1.10
- All three projects work
- Digital IO and Analog/PWM IO implemented, place holders for other functionality in the Arduino app
- There are two top level commands:
- SoftataLib.SendMessageCmd(“A simple one word command”)
- SoftataLib.SendMessage(SoftataLib.Commands.XXX,pin, (byte)data)
  public enum Commands
  {
      pinMode = 0xD0,
      digitalWrite = 0xD1,
      digitalRead = 0xD2,
      digitalToggle = 0xD3,
      analogRead = 0xA2,
      pwmWrite = 0xB1,

      Undefined = 0xFF
  }
- Digital IO
- SoftataLib.Digital.SetPinMode(pin, SoftataLib.PinMode.DigitalInput/Output)
- SoftataLib.Digital.SetPinState(pin, SoftataLib.PinState.HIGH/LOW)
- SoftataLib.Digital.GetPinState(pin);
- SoftataLib.Digital.TogglePinState(pin)Thre is also the general commands:
- Analog/PWM
- SoftataLib.Analog.AnalogRead(pin)
- SoftataLib.PWN.SetPWM(pin,value)
- Interaction starts with:
- SoftataLib.SendMessageCmd(“Begin”)
- And ends with:
- SoftataLib.SendMessageCmd(“End”)
- A board header file specifies, like in Firmata, valid pins for each interaction type (Digital, Analog, PWM etc)
-An invalid pin does not crash the Arduino app but cause an exception with the library.
- A call to a not yet implemented functionality (eg Serial, OneWire etc) does not cause any exceptions,
- There is a Watchdog timer as well as a command to force a sofware reset of the Arduino device.
- Each message to the device expects a response to be sent to the library and used to check if there was an issue, or contains requetsed data.
- 2DDo: Implement a timeout mechanism.
Usage
See the Console app but the IpAddress as determined when the Pico W runs must match that in the library. The ports must also match. The test app has two options:
- Digital IO: Button to LED
- Analog/PWM: Potentiometer sets LED brightness.
Sample .NET App Code
Digital Sample Code
This app toggles a LED on pin 12 and check teh state of a switch on pin 13.
  const int port = 4242;
  const string ipaddressStr = "192.168.0.13";

  static void Main(string[] args)
  {
      SoftataLib.Init(ipaddressStr, port);
      SoftataLib.SendMessageCmd("Begin");

      Thread.Sleep(500);

      SoftataLib.Digital.SetPinMode(13, SoftataLib.PinMode.DigitalInput);
      SoftataLib.Digital.SetPinMode(12, SoftataLib.PinMode.DigitalOutput);
      SoftataLib.Digital.SetPinState(12, SoftataLib.PinState.HIGH);

      Thread.Sleep(500);

      int n;
      for (int i = 0; i < 2; i++)
      {
          SoftataLib.Digital.GetPinState(13);
          SoftataLib.Digital.TogglePinState(12);
          Thread.Sleep(2000);
      }

      SoftataLib.SendMessageCmd("End");
  }
Digital Sample Output
Connecting to Softata Server.
Socket created to 192.168.0.13:4242

Sending: Begin
Sent 5 bytes
Received Ready [5] bytes

Sending: D0-0D-00
Sent 3 bytes
Received OK [2] bytes
...
...

Sending: End
Sent 3 bytes
Received Done [4] bytes
Note that all communications between the .NET host app and the RPI Pico are done synchronously. Each sent command has an expected (waited for and checked) response.
Analog/PWM Sample code
  SoftataLib.Digital.SetPinMode(LED, SoftataLib.PinMode.DigitalOutput);
  for (int i = 0; i < 50; i++)
  {
    int val = SoftataLib.Analog.AnalogRead(POTENTIOMETER);
    if (val != int.MaxValue)
    {
        Console.WriteLine($"AnalogRead({POTENTIOMETER}) = {val}");
        byte pwmVal = (byte)(val >> 2);
        if (val > 1023)
            pwmVal = 255;
        SoftataLib.PWM.SetPWM(12, (byte)(pwmVal));
    }
  }
Roadmap
- Implement the other capabilities in the Arduino app:
public enum CommandType : byte { Digital = 0, //Done Analog = 1, //Done PWM = 2, //Done Servo = 3, I2C = 4, SPI = 5, OneWire = 6, Undefined = 0xFF, } - Implement same in the library
- Add a Blazor and a maui sample app.
- Integrate the library with a NetCoreBlockly app.
Enjoy! :)
| Topic | Subtopic | |
| < Prev: | Blazor | Add PWA to a WebApplication |
| This Category Links | ||
| Category: | Softata Index: | Softata |
| Next: > | Softata | Architecture |


