

Grove Beginner Kit For Arduino: Codecraft Lesson 8 - Detecting Surrounding Temperature & Humidity
ardrpi arduino
Read the temperature-pressure sensor (DHT11). This page hasn’t been converted to Blocky style yet.
| The Grove Beginner Kit For Arduino includes an Arduino Uno board with preconnected devices. The Grove lessons supporting this present coding using the Arduino IDE. These pages present the same lessons using the Codecraft IDE that uses the Block style of coding with specific Grove Arduino blocks. |
Have you ever wondered about the temperature and humidity of your surroundings? Want to know the exact number? Want to wear a skirt or coat today depending on the temperature? Let’s make a temperature meter!
Background Information:
This lesson implicitly uses the Arduino DHTxx 1-wire library. That is, it is required, but CodeCraft loads it for you. The U8g2 library (as per lesson 6) is also implicilty used.
Detail Background (You can skip this)
- What is the 1-Wire Protocol?
As implied by the protocol name, 1-Wire requires just one line, plus ground return, for data signaling. When idle the 1-Wire line is resistively pulled up to a high state. The master device (the microprocessor) communicates with the sensor using controlled short pulses or time slots. A time slot is the time during which a logic zero or a logic one is written by the sensor and read by the master. The sensor sends the temperature and presurre and a digitally coded data stream back to the microprocessor.
- What is Protocol Signal (I2C)
Protocol signal: the protocol signal we use is I2C, so here is a brief introduction to I2C. I2C bus just needs two wires in the transmission of information connection between the devices: the SDA (Serial Data Line) and SCL (Serial Clock Line).
These two lines are bidirectional I/O lines, the main component used to start the bus transfer data, and generate the clock to open transmission device, any devices that are addressing at this time is considered from the device.
The relationship between master and slave(sender and receiver) on the bus is not constant but depends on the direction of data transmission. If the host wants to send data to the slave device, the host first addresses the slave device, then actively sends data to the slave device, and finally terminates the data transmission by the host. If the host is to receive data from the slave, the slave is first addressed by the master.
The host then receives the data sent from the device, and the host terminates the receiving process. In this case. The host is responsible for generating the timing clock and terminating the data transfer.
- Activity here: Let your OLED Display display the current ambient temperature and humidity.
Grove Beginners Kits Components
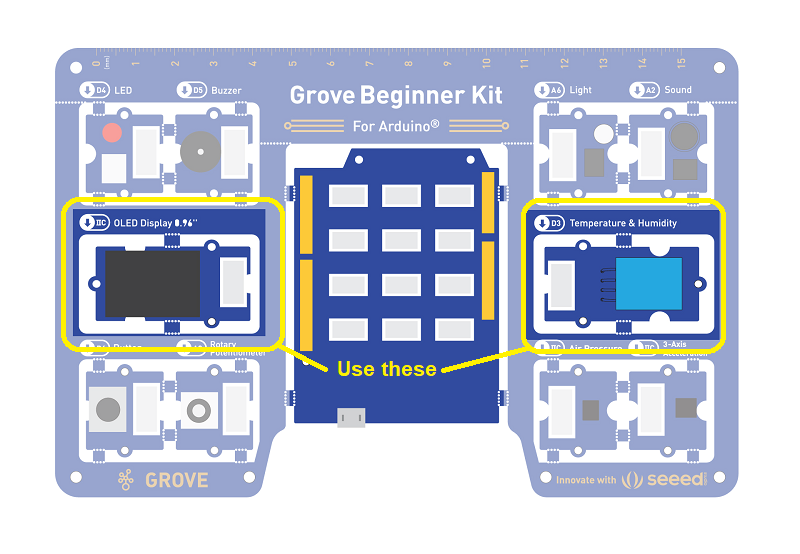
| Component | Interface | Pins/Address |
|---|---|---|
| LED | Digital | D4 |
| Buzzer | Digital | D5 |
| ==OLED Display 0.96”== | ==I2C== | ==I2C, 0x78(default)== |
| Button | Digital | D6 |
| Rotary Potentiometer | Analog | A0 |
| Light | Analog | A6 |
| Sound | Analog | A2 |
| ==Temperature & Humidity Sensor== | ==Digital== | ==D3== |
| Air Pressure Sensor | I2C | I2C, 0x77(default) / 0x76(optional) |
| 3-Axis Accelerator | I2C | I2C, 0x19(default) |
Components used for this lesson are highlighted.
-
Components Involved
- Grove Beginner Kit
- Grove OLED
- Grove Temperature and Temperature Sensor
This lesson reads temperature and humidity from the DHT22 sensor or a 1-wire (digital) connection. On overview of the sensor reading is here:
Simplified version
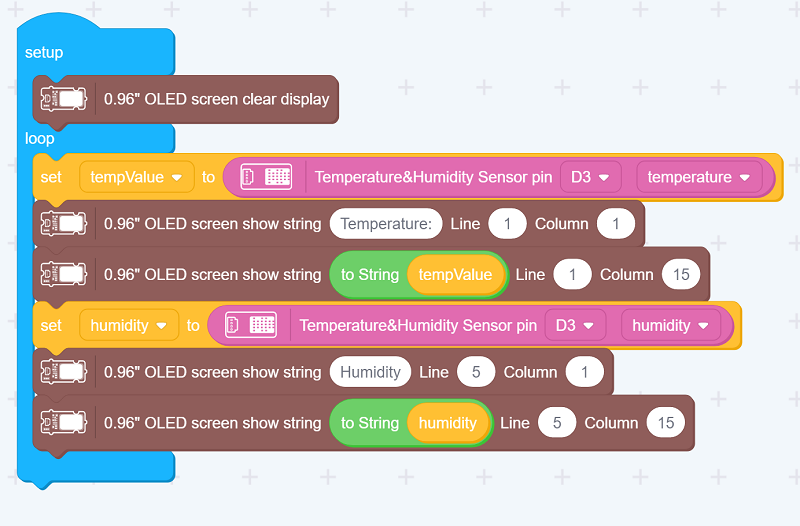
2. Implement the code block.
How to create this …
Watch the video on Youtube:
2Do: Ignore as this is a place holder.
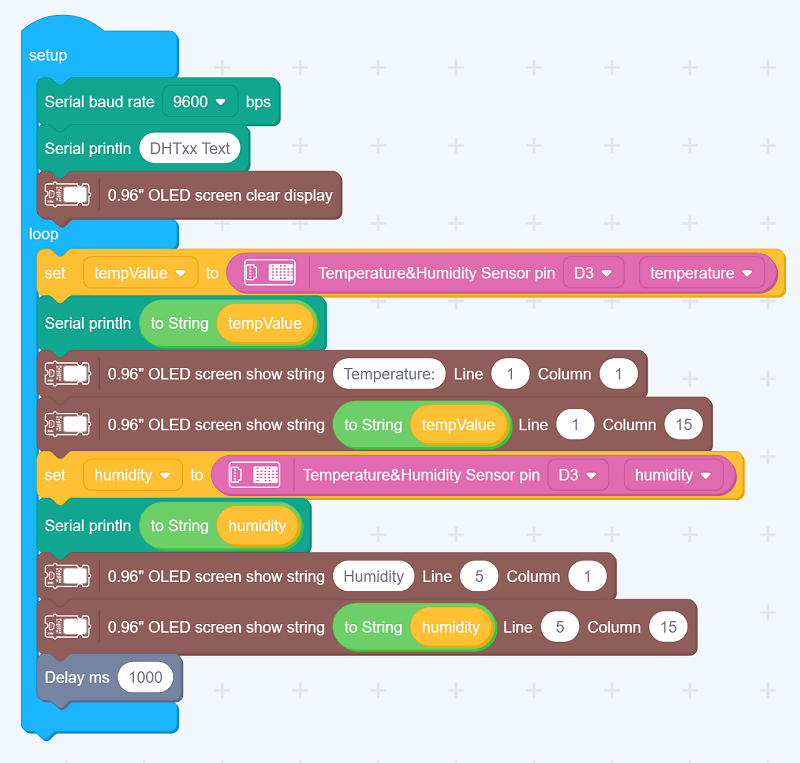
3. Run the app
Download the app to the board, as in previous lesson
Outcome: The surrounding temperature and humidity appear on the OLED screen.
Demo Effect and Serial Print Result:
The surrounding temperature and humidity appear on the OLED screen.
| Topic | Subtopic | |
| Next: > | Grove Beginner Kit For Arduino | Codecraft Lesson 9 - Measuring Surrounding Air Pressure |
| < Prev: | Grove Beginner Kit For Arduino | Codecraft Lesson 7 - Displaying Data on an OLED |
| This Category Links | ||
| Category: | Grove Arduino Index: | Grove Arduino |


