

Blazor: A WASM app for presenting Sample Apps from an API Repository
blazor blazor wasm pwa dotnet dotnetcore iot
In a repository such as dotnet/iot (on GitHub), rather than having to download the whole repository to get at the sample apps (or to copy and paste from web pages on GitHub) wouldn’t it be nicer to have a rich UI to present the samples in an interactive way such that when you find one you want, you can get all of project code just for that sample app. GetAnIOTSampleApp does just that for the dotnet/iot repository.
About dotnet/iot Repository
That repository is for building the System.Device.GPIO and IoT.Device.Bindinings .NET Standard/.NET Core packages (respectively). The First package provides a GPIO API for Windows 10 IoT-Core and for Linux both runningon devices such as the Raspberry Pi. The Bindings presents device drivers for a plethora of hardware devices running on those target devices. Along with each device (or in some cases a set of related devices) are sample apps. These apps as presented can be built in situ if present within the complete repository. The GPIO and Bindings get directly built into the samples along with their device drivers.
The file structure of the repository is:
- iot
  - artifacts
  - samples
  - ..Some other folders
  -- src
    - devices
    - Iot.Device.Bindings
    - System.Device.GPIO
    - System.Device.GPIO.Tests
The folders of interest here are the first 3 under src: devices, Iot.Device.Bindings and System.Device.GPIO. The first two are for building the API dlls for inclusion in the sample apps, or for building the API Nuget packages (as discussed in eth previous blog post here).
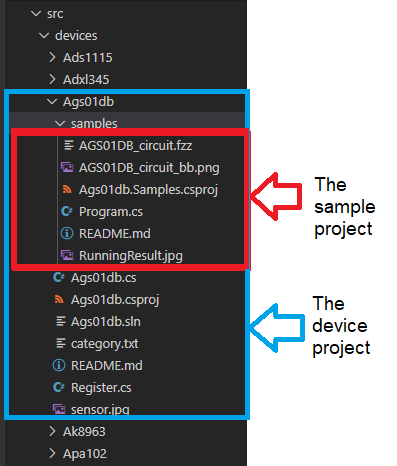
Note that the iot\samples apps are not the sample apps in question here. They are more extensive solutions. The sample apps of interest are a simple demonstration each device. They are location in the samples folder located under each device’s project folder, which are located under the src/devices folder:
Nb: I have forked my own version of dotnet/iot on GitHub with a few modifications/additions: djaus2/iot
Links:
- dotnet/iot GitHub repository
- djaus2/iot my fork of that repository with some modifications.
- djaus2/dotnet-iot-samples the Blazor Wasm app.
The client UI
This is a Blazor Web assembly (WASM) client app. It is also configured as PWA app so it can be stored as an app on desktops etc. The app’s maain page is an index in which the user selects a sample app from a menu (a folding menu). Once selected, other pages can be displayed such as the project file and the source file. From here they can be copied or downloaded. If there is a circuit file, that can also be displayed on a another page. There is then pages instructing on how to get the sample app up and running on a target such such as a RPi. The Client app makes Http calls to get the required meta-information and to get project, source and image files from the repository. The server also serves up some Markdown content that is transformed into Html on the client.
Data Mining
The repository Sample App metadata is generated by the server from a copy of the repository on teh server. Much use is made of Linq to extract the meta-information for each sample app from the repository by recursing the directory. It could have been saved in a database but Collections such as Lists of Lists and Dictionaries were used.
Each sample project has properties such as the project name, its location, its device name, its source file etc. These are specified in the Project class: See Project Class.
In the initialisation of the server app, the src/devices folder is recursed down to each device’s samples folders and a project class instance is created for each sample app. Note tha in some cases there is more than one sample app in that folder, such as Bmxx80. An instance is created for each and added to a list. Note that for simplicity, a list is also made of the number of projects for each device at this point. Also some assumption were made, such as the source file name is the same as the project filename. Some exception to this were allowed for such as the source file name being program(.cs). Some other source filenames were different by one letter; again allowed for. The final assumption was that there is only one source file which is not true in at least one case. At the moment, this has not been allowed for but it the situation is flagged when meta-information about that project is displayed.
A dictionary is then created, keyed in the projects’ device name. The dictionary is created by Grouping the Projects list on DeviceName. This call is made in the server’s Startup.Startup() which calls a method in the app’s Shared project. See That information is also further groups that information by the the first character of the DeviceName into AlphaList. See The Index page of the client app then is able to display an expanding/folding menu based on these first letters. The data collections are statically saved in the Shared class for ease of access by the server’s controller class. _(Ps: 2Do: Clean up the WeatherForecast remnants.)
Client Functionality
    private List<IGrouping<char, KeyValuePair<string, List<Project>>>> AlphaList = null;
    public static List<AlphaCount> AlphaCount { get; set; }
    private Dictionary<char, List<SampleCount>> AlphaDict { get; set; }
    private Dictionary<char, bool> AlphaViz { get; set; }
    private Dictionary<string, List<Project>> Projects { get; set; }
_**Index page data structures
The main client page is the Index page. When first called it make a Get() call to the SampleClient instance to get the AlphaList. That then makes a Http call to get it from the server. This also caches it as a static property so that subsequent calls do not need to go to the server; it is static data. For each letter in the AlphaList’s list of keys (chars) a <char,bool> dictionary called AlphaViz entry is created using that key and a boolean value set to false. The Index displays each character keys as a row in a table plus the number of sample apps under each key (a Linq query is done for this). For any AlphaView key that is subsequently set to true, by clicking on it, its list of devices displays as rows below it. If there is only one sample for a device then that project’s name is displayed as button on the same row. If there is more than one sample for a device, then the count for then is displayed and the list of sample project names are displayed (from AlphaDict) as buttons in further rows below the device row. A second click of an expanded key, will contract it. The Index page menu expansion and contraction is simple to create using ASP.NET-Razor code:
    @foreach (var a in AlphaCount)
    {
        Display character a as a Button and list the number of sample project under it.

        @if (AlphaViz[a.Key])
        {
            @foreach (var device in AlphaDict[a.Key])
            {
                if only one sample app then display each project name as a Button
                else Display number of sample apps for device and ..
                @foreach (var p in Projects[b.Key])
                {
                    Display sample project name as a Button.
                }
            }
        }
    }
When a sample app is selected by pressing its button the its button, the devices page opens. The device and project names are supplied as parameters that are used to get the specific project class instance for the sample app. This is done using the data entities already present on the client. this is then used to request from the server the sample’s ReadMe.md page. This is then rendered after being passed to custom component taht turns it into Html. For that the lunet-io/markdig plugin used.
Other pages make requests for files from the server. These are:
- Device Readme.md file, ReadMe
- Sanple app C# Source file, Sourcefile
- Sample App projectfile, ProjectFile
- circuit image files, _Image
- Some other pages that are essentially just Markdown content.
For these requests to the server, a parameterised Http Get call is made that includes the project and the type (in italics above). As an example, the call from the C# source page is:
    project = Services.SamplesClient.CurrentProject; //This is statically saved by the device page

    string DeviceNameProjectName = project.DeviceName + "-" + project.Name + "-SourceFile";
    filecontents = await _SamplesClient.GetFile(DeviceNameProjectName);
    textToCopy =  filecontents;
Upon reception of the query, the server controller then splits the DeviceNameProjectName parameter (using the - character) and then can get the specific file (using teh filetype) for the device-project, which it returns.
Note that the filecontents is diaplayed by assigning it to a page variable that is included in the razor page’s html as parameters to custom components. For Markdown content, a Markdig based component renders the content as Html after the assignment. For code text is provided as a parameter to custom component that displays in a cell but also has two buttons. One that copies it to the ClipBoard, the other that downloads the file, when pressed.
| Topic | Subtopic | |
| Next: > | Blazor | SPA Template |
| < Prev: | Nuget Packages 101 | Creating and using a local Nuget Package |
| This Category Links | ||
| Category: | Blazor Index: | Blazor |
| Next: > | Blazor | A Generic App for displaying Sample Apps |
| < Prev: | Blazor | On a Raspberry Pi |


