

.NET Core on IoT: One more way of doing this - Background
iot powershell dotnetcore iothub azure iot-core devicestreaming telemetry raspbian
It may at times be convenient, but building an app on the RPi, whether for IoT-Core or for Raspbian might not be the most efficient way of doing it. Lets look at building the app on the desktop and then copying the built dotnet app to the Pi.
Runtimes
You can build a targeted .NET Core project build in Visual Studio, in Visual Studio Code are simply from the command line. The target, or runtime, specifies the operating system and CPU architecture. The OS can be Windows, Linux or MacOS. the CPU can be x64, x86, ARM (ARM32) or ARM64. Specifically, MacOS can only be juxtaposed with the x64 CPU. Linux flavours can be Portable, or specifically Red Hat or Tizen. A .NET Core Runtime is specified by its RID (Runtime IDentifier).
Windows RIDs
Portable (.NET Core 2.0 or later versions):
- win-x64
- win-x86
- win-arm
- win-arm64
Linux RIDs:
Portable (.NET Core 2.0 or later versions):
- linux-x64 (Most desktop distributions like CentOS, Debian, Fedora, Ubuntu, and derivatives)
- linux-musl-x64 (Lightweight distributions using musl like Alpine Linux)
- linux-arm (Linux distributions running on ARM like Raspberry Pi)
More on RIDs here and a complete list of RIDs is contained in the this json file.
When you download a runtime or SDK binary teh filename is as follows
dotnet-<sdk|runtime>-<Version>-<Build No.>-<RID>-<.zip|.tar.gz>
For example the current Windows 10 x64 sdk and runtime files are:
- dotnet-sdk-3.1.102-win-x64.zip
- dotnet-runtime-3.1.2-win-x64.zip
3.1 is the version of .NET Core.
102 and 2 are the release/update numbers. That is SDK 3.1.102 is an update to SDK 3.1.101 and runtime 3.1.2 is an update to runtime 3.1.1
Both are for for release 3.1.2 of .NET Core, the second update to version 3.1
As per previous, the individual runtimes (and SDKs that contain the those runtimes) can be separately downloaded from here Complete installers for the desktop can be found here. Normally when installing Visual Studio, you get a complete installation of the .NET Core SDK containing the various versions of .NET Core. To get the latest (V 3.1.1 or later), you need Visual Studio 2019 (v16.4).
Building Targeted builds on the desktop
Whilst running on a development machine you CAN build a .NET Core project that targets another OS-CPU content; that is cross compilation. You build and then deploy the built app to the target by copying it to there. One slick possibility is to have a copy of the project (eg a copy of the Quickstarts) on the target in a share and connect to that share from the share. You then work with the project on the desktop from there. No copying after the build in that case. Note though that unlike with UWP apps an IoT-Core target, there is not an option to automatically deploy and debug a .NET Core core project from Visual Studio. A partial way around this is is to set the target location for Publish to the remote share.
To debug a .NET Core app running on a remote device, you have to start the app on the remote device and then attach to that remote process from the desktop. As mentioned in teh previous paragrapgh, you can’t auto deploy and debugg directly to a remote device from Visual Studio. You have to install the VS Remote Debugger on the target. Scott Hansleman dicusses remote debugging on the Pi using VS Code here Dave Glover also discusses it here and here. These cover some automation options for deploying and debugging in VS Code. More on this later.
Desktop Build Options for a Remote Target
You build a package for deployment using Publish. That is a menu option in Visual Studio. In VS Code or from the command line in generally you use the dotnet Publish command. A simple example is dotnet publish --runtime linux-arm --framework 3.1--self-contained false
This will build a Debug version for the Pi running Raspbian, of the project in the current folder using the installed version of .NET Core 3.1. This requires .NET Core 3.1 to be installed on the target. Note that in this case, for a simple Console app, there are only 5 files in the Publish folder (Projectfolder\bin\Debug\netcoreapp3.1\linux-arm). If self-contained was set to true (which is the default) you get 192 files!. The Self Contained package that does not require .NET Core be installed on the target. It includes the runtime components specified by the RID.
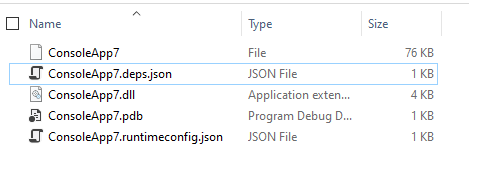
The files in the Publish folder
The first file is the application to run. The .pdb is the debug file (as this is a Debug build). The two .json files are runtime configuration files. These are used at runtime to load the required DLLs (ProjectName.deps.json), and what .NET Core version to use (ProjectName.runtimeconfig.json). The DLLs to load include the ProjectName.dll and Nuget packages specified in the project file.
Publish and Build Options
The option are listed below. The command line syntax is shown and the val;id option values are listed.
- Configuration
c|--configuration <CONFIGURATION>- Release
- Debug
(Default)
- Target Framework
-f|--framework <FRAMEWORK>- 3.1 or whatever versions you have installed
- Version Suffix
--version-suffix <VERSION_SUFFIX>- Added to the 3.1 above. Default is * which mean get the latest release of V 3.1
2 would mean 3.1.2 is specified
- Added to the 3.1 above. Default is * which mean get the latest release of V 3.1
- Deployment Mode
--self-contained false/true- Framework Dependant
false - Self Contained
true
- Framework Dependant
- Target Framework
-r|--runtime RID- Portable
- An RID
If Publishing via Visual Studio, you can create a profile configuration xml file: FolderProfile.pubxml
- Solution Explorer/Right-click on the project/Select Publish
- Select Folder option
- [Create Profile]
- When created, choose [Edit] and you can fine choose the options.
- When ready press[Publish] to generate the publish folder]
- The Publish Folder is specified in the options tab.
- The profile file is located in
Project Folder\Properties\Publish Profiles
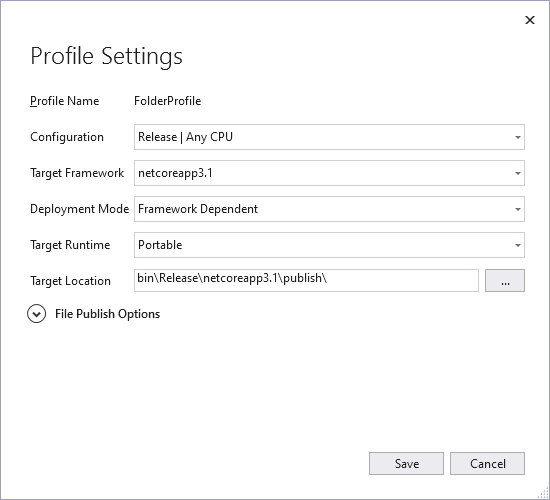
A FolderProfile.pubxml file
And its contents:
<?xml version="1.0" encoding="utf-8"?>
<!--
https://go.microsoft.com/fwlink/?LinkID=208121.
-->
<Project ToolsVersion="4.0" xmlns="http://schemas.microsoft.com/developer/msbuild/2003">
  <PropertyGroup>
    <PublishProtocol>FileSystem</PublishProtocol>
    <Configuration>Release</Configuration>
    <Platform>Any CPU</Platform>
    <TargetFramework>netcoreapp3.1</TargetFramework>
    <PublishDir>bin\Release\netcoreapp3.1\publish\</PublishDir>
  </PropertyGroup>
</Project>
Next: Publishing a .NET Core App … The Steps
| Topic | Subtopic | |
| This Category Links | ||
| Category: | IoT Index: | IoT |
| Next: > | .NET Core on IoT | Remote Publishing to the RPI |
| < Prev: | .NET Core on IoT | Using the PS Script to run Quickstarts on RPi (Raspbian) |


