

.NET Core on IoT: Getting started on Win 10 IoT Core
A Quickstart for setting up .NET Core V3.1 on a RPi running IoT-Core so as to be able to build and run .NET Core apps from the command line. Start with a Console app. An ASP.NET Core MVC Web App is also run on the device.
Summary
We will download the .NET Core zipped folder, expand it and place it on the SD card that hosts the Win 10 IoT-Core OS. Then when booted we open a remote terminal to the device (eg PowerShell or SSH) and add the location of that folder to the system path. We then set an environment variable pointing to the same folder. We are then good to create .NET Core projects, and build and run them from the command line.
Setup
- Get the zipped folder at dotnet.microsoft.com/download/dotnet-core/3.1
- In second column, first row of the table, under SDK 3.1.100 look for the Windows line:
| Windows | x64 x86 | ARM32 x64 x86 |
Click on the ARM32 link in that line or above and accept the download.
Make sure it’s the SDK download and not the Runtime. Its called dotnet-sdk-3.1.100-win-arm.zip
- In second column, first row of the table, under SDK 3.1.100 look for the Windows line:
- Extract the folder to a temporary location.
- Remember to Unblock the file from its properties first.
- To simply things, rename the folder to dnc (optional)
- Load the IoTCore SD Card on your desktop and copy the unzipped folder to it.
- N.b. I had 4 drives on my SD Card (G:,H:,I: and J:). I copied to the larger capacity one (j:), labelled Data.
- Alt. Place it in drive called Main (H: for me, see later)
- Replace the SD card and reboot.
- N.b. I had 4 drives on my SD Card (G:,H:,I: and J:). I copied to the larger capacity one (j:), labelled Data.
- Open a terminal to the IoT-Core
=
cd c:\dir \Data- You should see the dnc folder listed.
- If you put the folder in the drive on the SD Card called Main then instead
- Stay in the root of c:\
dir- You should see your folder there.
- Run dotnet using:
c:\data\dnc\dotnet --version,
ORc:\dnc\dotnet --versiondepending upon where you placed the folder.
- You should see the .NET Core version. e.g.:
[192.168.0.9]: PS C:\> data\dnc\dotnet --version 3.1.100 - Now add dotnet.exe to the path e.g.
$env:path +=';c:\data\dnc' $env.path - You should the dotnet path added to the path.
- Now run
dotnet --version, that is without a full path, from the root. It should work again. - Make a new directory off the root, say apps, and cd into it.
- Make a subdirectory, app1 below that and cd into it.
- When we create projects from the command line, the project is created in the pwd. So create a new folder and use that when creating a new project. Alt: There is also a –name option for this.
- Run
dotnet new console- This is to create a Console app that outputs “Hello World”
dirTo see what was created.- Now lets try to run it. Note that
dotnet restoreis now not needed.dotnet run
- You get some “garbage”. The important bit when deciphered is:
... or use the DOTNET_ROOT environment variable to specify the runtime location. - So run
$env:DOTNET_ROOT='c:\data\dnc'- Or
$env:DOTNET_ROOT='c:\dnc'depending upon where you placed the folder.
- Or
- Issue the run command again:
dotnet run - 😀😀😀😀😀 WE ARE THERE! 😀😀😀😀😀
[192.168.0.9]: PS C:\apps\app1> dotnet run Hello World! - Explore the contents of the folder by copying as a share (create c:\apps as a share) or via ftp and see what was created.
- The path and environment variable settings only exist for the current terminal.
- Create a batch file to encompass them:
$pth='c:\Data\dnc $env:path +=';c:\data\dnc' $env.path $env:DOTNET_ROOT='c:\data\dnc' - Save this as say, c:\bat\dnsetup.bat
- Then when a new PowerShell terminal is created run
c:\bat\dnsetup - Could create similar batch file for ssh access.
- Create a batch file to encompass them:
- Lets create a web site:
- Make a new folder c:\apps\web1 and change into it.
dotnet new mvc- Open a file access portal (share or ftp) and edit the file Properties\launchsettings.json
- Edit the last section to remove https://localhost:50001;
"web1": { "commandName": "Project", "launchBrowser": true, "applicationUrl": "https://localhost:5001;http://localhost:5000", "environmentVariables": { "ASPNETCORE_ENVIRONMENT": "Development" } } - Then run
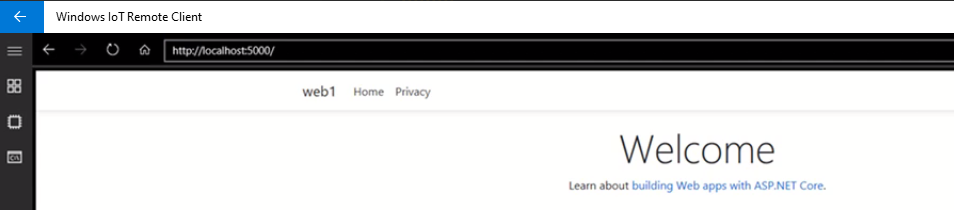
dotnet run - In the DefaultApp for the IoT-Core device run the web browser and enter the URL
http://localhost:5000
And here we have it:
- Alternatively open a second PowerShell terminal to the device
- Enter
Invoke-WebRequest http://localhost:5000 -o home.html - Then
type home.html - You’ill get the web page file contents displayed.😀
- Enter
From the first project creation:
Read more about .NET Core CLI Tools telemetry: https://aka.ms/dotnet-cli-telemetry
Explore documentation: https://aka.ms/dotnet-docs
Report issues and find source on GitHub: https://github.com/dotnet/core
Find out what’s new: https://aka.ms/dotnet-whats-new
Learn about the installed HTTPS developer cert: https://aka.ms/aspnet-core-https
Use ‘dotnet –help’ to see available commands or visit: https://aka.ms/dotnet-cli-docs
Write your first app: https://aka.ms/first-net-core-app
*Next: As above but for Raspbian
| Topic | Subtopic | |
| < Prev: | Some PowerShell Functionality | |
| This Category Links | ||
| Category: | IoT Index: | IoT |
| Next: > | .NET Core on IoT | Getting started on Raspbian |
| < Prev: | .NET Core on IoT | Options for the RPi |


