

Softata: A Quick Start with Blazor
softata softata
Another quick way to get started with Softata without building the code using Azure hosted Blazor app.
Its all available here: SoftataBlazor
Setting up RPi Pico W SoftataSketch
The RPi Pico W Softata sketch can be setup as for Blockly in the previous post:
Follow instructions from the Blockly site: softatawebapii site
- Install the Softata RPi Pico W Sketch.
- 2 Options:
- Install non-IoT Sketch
- Install Azure IoT Hub Sketch
- 2 Options:
For each of the above, take the softatawebapii link above and follow the directions.
Running the RPi Pico W Sketch
- Once booted, you get some menu options, so you need a serial terminal to the Pico via USB Serial.
- First time you need to open this terminal and take the option to enter new configuration details:
- WiFi SSID
- WiFi Password
- IoT Hub details(Hub, Device and connection string)
- Can be ignored if not using IoT. Just press enter for each.
- A GUID, can also be ignored.
- These setting will be saved in flash such that next time their entry can be skipped and you can boot without a terminal.
- There a coded signals with the inbuilt LED indicating the boot state.
- For further details see Softata-Arduino_Startup_Options
- The apps can then connect once the Pico is fully booted.
Connecting from Azure
BlazorSoftata can be built and hosted locally. The Azure BlazorSoftata link SoftataBlazor for it above is though hosted on Azure and can be used for Softata with out any local build. Both sketches (with or without IOT Hub) will require some tunnelling from Azure to your local location. This can be done using ngrok (requires a simple installation) or NAT. See Softata: Running Blockly on local Pico from Azure Softata API. If you use ngrok, you only need supply an index and ngrok port at connection from Blazor.
- When the BlazorSoftata site is first connected to in a browser you select using Grove connectivity or not. You then start the connection.
ngrok
Follow first two steps here: ngrok installation to install ngrok on your desktop. Add authentication later.
With the ngrok setup locally run:
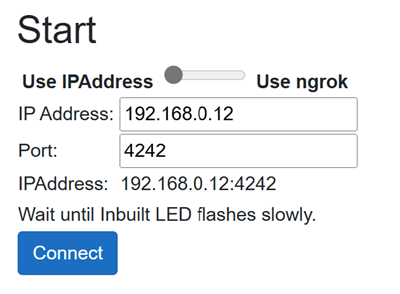
ngrok tcp 192.168.0.12:4242
… where 192.168.0.12 is the Pico’s IPAddress and 4242 is its TCP service port, this will return with something like:
Forwarding tcp://4.tcp.ngrok.io:15129 -> 192.160.012:4242
In BlazorSoftata take the ngrok option.
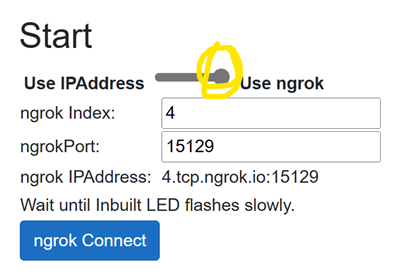
You will then only need supply 4 from 4.tcp.ngrok.io as shown to the NgrokConnect block as the IPAddress.
And the Port is 15129.
Tap and rotate phone to enlarge.
Using IPAddress (default/local) to connect
- Press on ngrok side of toggle button (yellow below):
Tap and rotate phone to enlarge.
Using ngrok (remote) to connect
- Enter the ngrok Index and Port
- [ngrok Connect]
So, “magically”, BlazorSoftata running on Azure will connect to the Pico service running locally and orchestrate it!
:)
Further
Once the connection is made, you select:
- Test Category (Device type)
- Device
- Use Defaults or choose connectivity options (if available),
- Connect the device as selected.
- Set a period (in mSec) for test steps
- Run the test/s
| Topic | Subtopic | |
| Next: > | Softata | Open AI and Enums with Blockly & Swagger Part 1 |
| < Prev: | Softata | A Quick Start with Blockly |
| This Category Links | ||
| Category: | Softata Index: | Softata |


