

Softata: ngrok update - 2
softata softata
ngrok can be used to tunnel from remote service to a local device.A Console app has been developed to generate the ngrok.yml configuration file for running multiple tunnels for local tcp instances.
Previous
- The previous post: ngrok update - 1
- The first post: Softata: Running Blockly on local Pico from Azure Softata API
About the ngrok Config file
As per the previous posts, when installed and configured you run ngrok start command locally from a command line such as:
ngrok tcp 192.168.0.11:4242
This will give an external IPAddress and port such as 0.tcp.au.ngrok.io and 16119 to use as an external TCP connection to the target local device at 192.168.0.11:4242.
With the free version of ngrok, you can only run one such instance with your credentials. By configuring the ngrok config file though, you can include multiple tunnels to local targets and start them all or individually with the ngrok command line.
The config file is a .yml Yaml file. The minimal file is:
version: "2"

authtoken:  7ioplmg6jf41234567890wdrkindghe1234567890wsxrfg679

tunnels:
The authtoken is the user asigned token you get when YOU install ngrok and register for it.
As per ngrok Agent Configuration File this file is located at:
For the main operating systems supported, their default file locations are:
- Linux: ~/.config/ngrok/ngrok.yml
- MacOS (Darwin): ~/Library/Application Support/ngrok/ngrok.yml
- Windows: “%HOMEPATH%\AppData\Local\ngrok\ngrok.yml”
For Windows this will typically be something like \users\myname\AppData\Local\ngrok\ngrok.yml, \users meaning c:\users
Run:
ngrok config check
… to get the assumed location of the config file once ngrok is installed:
C:\Users\myself>ngrok config check
Valid configuration file at C:\Users\myself\AppData\Local/ngrok/ngrok.yml
With the Windows install it appears that this config file is not used, doesn’t exist until manually created. ???
Zip file Installation
In the previous post, the Microsoft Store Installer was used and was found to be OK for a single tunnel. You registered, got an authtoken, installed it then registered the authtoken. (See previous post.) But this was found to be problematic when trying to run multiple tunnels defined in a config file. The installation to then use for multiple tunnels is from a zip file. You download it, unzip to a folder, then set a path to it manually. Then run the `ngrok config add-authtoken’ as previous. The last step possibly could be ignored because the authtoken is included in the config file we will use.
The Zip Download: The Download tab there, click on [Download] button.
Multiple tunnels
An example of the config file where there are 2 local targets 192.168.0.7 and 192.168.0.11 is:
version: "2"

authtoken:   7ioplmg6jf41234567890wdrkindghe1234567890wsxrfg679


tunnels:
  tcp07:
    proto: tcp
    addr: 192.168.0.07:4242
  tcp11:
    proto: tcp
    addr: 192.168.0.11:4242
The commands then are:
ngrog start --all
or ...
ngrok start tcp07 tcp11
or ...
ngrok tcp07
or
ngrok tcp11
The Console app
There ais now a WPF Console app MgrokUtil on GithHib at djaus2/MgrokUtil for generating the config file given an authtoken and local IPAddresses as targets. You only need the last number of the IPAdresses.
---------------------------
MgrokUtil Help
---------------------------
MgrokUtil command line options:
  --help, -h
      Show this help and exit.
  --clear, -c
      Clear persisted settings (Path/AuthToken/Port) and exit.
  --path=<file>, -p=<file>  [Default]
      Default: %HOMEPATH%\AppData\Local\ngrok\ngrok.yml
      Path to ngrok.yml ('.yml' is appended if missing).
      If a single positional argument is provided, it is treated as the path.
  --authtoken=<token>, -a=<token>
      Optional ngrok authtoken (must be 49 chars, [A-Za-z0-9_]).
      If the config file is missing, providing a valid authtoken will create it.
  --port=<port>, -t=<port>
      Default: 4242.
      If existing tunnels contain an addr port, that port is used unless overridden by th e commandline.
  --network=<ipv4>, --nw=<ipv4>, -n=<ipv4>
      Network IPv4 used for tunnel addr generation; must exist locally.
      Default: 192.168.0.0
  --ipBase=<csv>, -i=<csv>
      CSV of ports/ids (1..234).
      If value starts with '+', merges with existing tcp<port> tunnels; otherwise replaces them.
---------------------------
Running the mgrokutil to re/generate ngrok.yml
mgrokutil --ipBase=11,07 --port=4242
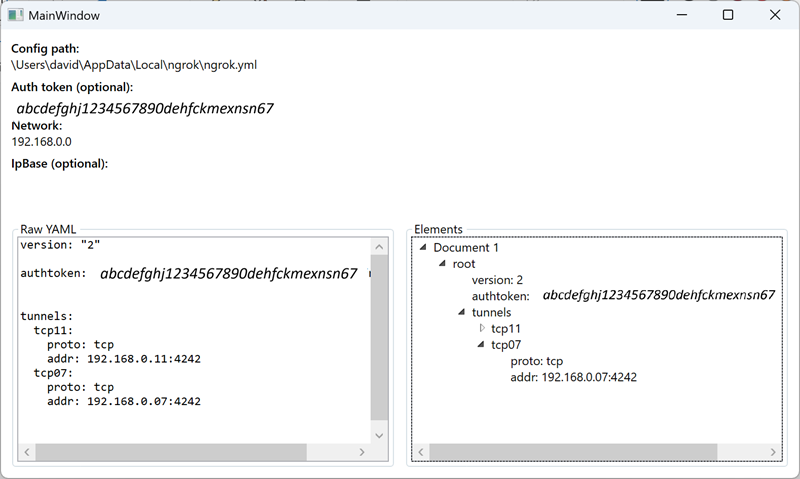
Tap and rotate phone to enlarge.
ngrokutil with 2 local targets ..07 and ..11
Nb: Tunnels are named as tcp<ip> i.e.
tcp07andtcp11here.
Once generated run with
ngrok start --all
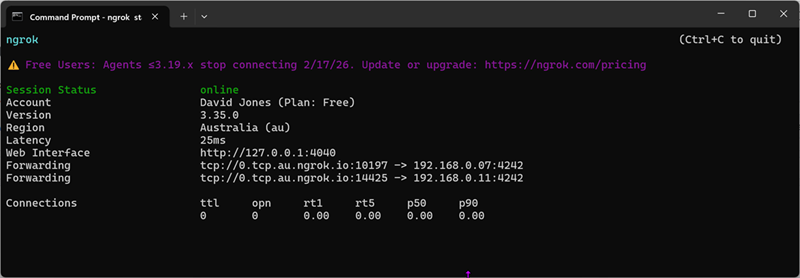
Tap and rotate phone to enlarge.
ngrok with 2 tunnels configured to ..07 and ..11
You can just name the tunnels eg
ngrok start tcp11etc
ngrokutil
- –clear will will remove all tunnels from the config file and exit.
- If no authtoken in the comamnd line, then the one in the existing ngrok.yml will be used or else the previously registered authtoken will be used.
- If ipBase start with a +, i.e. “+8,9” these generated tunnel specifications are appended to the existing the existing tunnels. If No + then current tunnels are removed first.
- In ipBase, if any tunnels specified more than once, the extras are removed.
- If no –port command line option, then the exist port in the existing config file will be used. Failing that the default, 4242, will be used.
Using ngrok with Softata Blockly
It can be used to connect a local RP’ Pico W to the Azure hosted Softata Blocklyat:
- Expand the
Run Blocklylink and follow instructions there. - Further:
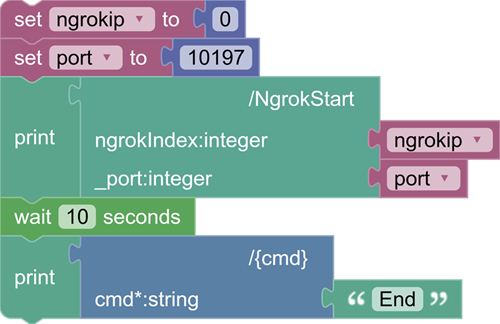
Tap and rotate phone to enlarge.
A Sample Softata Blockly app
Note that this uses the ngrok tunnelling for 192.168.0.07:4242 using 0 from 0.tcp.au..., the ngrokip value and 10197 the port, for tcp://0.tcp.au.ngrok.io:10197
Footnote
If the ngrok.yml config file doesn’t exist in the default location, given that you have the authtoken, you can generate one, without any tunnels by running:
ngrok --authtoken=<Insert your authtoken>
| Topic | Subtopic | |
| Next: > | Checkers-Draughts Game | Overview |
| < Prev: | Softata | ngrok update - 1 |
| This Category Links | ||
| Category: | Softata Index: | Softata |


