

Markdown: A Script to Paste an Image -- Updated
web jekyll markdown html
A Markdown-Jekyll Powershell script to simplify pasting images into a Jekyll blog post. Updated
Update: Can specify the image width when clipboard is saved and does a collision check and fix wrt the image filename.
You can paste an image directly into some Markdown editors, but this often results in the image being saved in the root folder of the project with a bland filename. This script allows you to save the image to a specified media folder with a meaningful filename and generates the appropriate Markdown syntax for easy inclusion in your documents. It now also makes sure the image filename is unique.
Usage
- Context: Creating a Jekyll blog post using a Markdown editor
- Assuming: The script
SaveClipboardImage.ps1is in the scripts folder- The Script
SaveClipboardImage.ps1is listed below. - Can start paste of an image from the clipboard into a Jekyll post
- Prompts for image name and width (px)
- Stores the modified image in /media.
- Liquid code for displaying image in a post is then generated
and copied to the clipboard for pasting into the post.
Includes raw markdown for image as well. - Needs image.html in /_includes for this to work.
- The Script
- Requirement: The custom component
image.html - Copy: The image to the clipboard. I usually use the Windows Snipping Tool.
- Run:
.\scripts\SaveClipboardImage.ps1 - NB: You will get: ❌ No image found in clipboard. if that is the situation.
- A typical session:
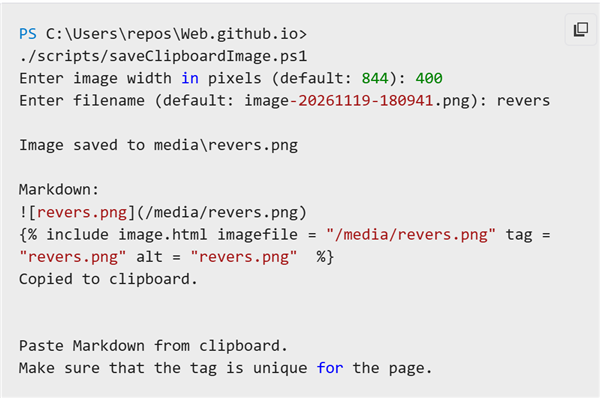
Tap and rotate phone to enlarge.
Note: The raw markdown link for the image is supplied plus the one using the include file
image.html. Use the first to view in the editor. Use the second for deploy Jekyll blog post as it implements special features making the layout wrt the image sensible on a phone. (See previous posts.)
Earlier blog posts wrt the image paste script
- Jekyll: Simplify posting images to a post
- Jekyll: Rendering on a Mobile Part 1
- Jekyll: Rendering on a Mobile Part 2
- Jekyll: Image Transform Script
Nb: Some repetition in what follows.
About the Script
- Copy image on clipboard to /media folder (or specified folder)
- Prompt for the saved image width in pixels (defaulting to the original width), preserving its aspect ratio
- Prompt for filename (with default based on date/time)
- Append a random four-digit suffix to the filename if it already exists
- Output Markdown syntax to reference the image
- Markdown is copied to clipboard for easy pasting
- Provides 2 formats for image reference
- Standard Markdown
- Custom resizing image macro for a Jekyll site
- Ref Jekyll: Rendering on a Mobile Part 1
- See that link for information about the macro/include.
- Having both allows the image to viewed in the editor’s preview.
- Can delete or comment out the Markdown syntax version.
Usage:
the script, as below is saved to ` .\scripts\SaveClipboardImage.ps`
Copy an image to clipboard, then run the script from a PowerShell terminal:
.\scripts\SaveClipboardImage.ps1 [-MediaFolder <path>]
The Script
# SaveClipboardImage.ps1
#
# Copy image on clipboard to /media folder
# Prompt for the saved image width, preserving its aspect ratio
# Output Markdown syntax to reference the image
# Markdown is copied to clipboard for easy pasting
# Provides 2 formats for image reference
# - Standard Markdown
# - Resizing image macro for Jekyll site
# - Ref [Jekyll: Rendering on a Mobile Part 1](https://davidjones.sportronics.com.au/web/Jekyll-Rendering_on_a_Mobile-rel-web.html)
# Usage:
# .\SaveClipboardImage.ps1 [-MediaFolder <path>]
param(
[string]$MediaFolder = "media"
)
# Ensure media folder exists
if (-not (Test-Path $MediaFolder)) {
New-Item -ItemType Directory -Path $MediaFolder | Out-Null
}
# Get image from clipboard
Add-Type -AssemblyName System.Windows.Forms
$image = [System.Windows.Forms.Clipboard]::GetImage()
if ($null -eq $image) {
Write-Host "❌ No image found in clipboard."
exit
}
# Prompt for a positive width, defaulting to the original width
do {
$inputWidth = Read-Host "Enter image width in pixels (default: $($image.Width))"
if ([string]::IsNullOrWhiteSpace($inputWidth)) {
$width = $image.Width
$validWidth = $true
} else {
$width = 0
$validWidth = [int]::TryParse($inputWidth, [ref]$width) -and $width -gt 0
if (-not $validWidth) {
Write-Host "Please enter a positive whole number for the width."
}
}
} while (-not $validWidth)
# Generate default filename
$defaultFileName = "image-$((Get-Date).ToString('yyyyMMdd-HHmmss')).png"
# Prompt user for filename (default shown in brackets)
$inputFileName = Read-Host "Enter filename (default: $defaultFileName)"
if ([string]::IsNullOrWhiteSpace($inputFileName)) {
$fileName = $defaultFileName
} else {
# Ensure .png extension if missing
if (-not $inputFileName.EndsWith(".png")) {
$inputFileName += ".png"
}
$fileName = $inputFileName
}
# Resize only when needed, preserving the original aspect ratio
$resizedImage = $null
try {
$imageToSave = $image
if ($width -ne $image.Width) {
$height = [Math]::Max(1, [Math]::Round([double]$image.Height * $width / $image.Width))
if ($height -gt [int]::MaxValue) {
throw "The requested width produces an image height that is too large."
}
$resizedImage = [System.Drawing.Bitmap]::new($width, [int]$height)
$graphics = [System.Drawing.Graphics]::FromImage($resizedImage)
try {
$graphics.CompositingMode = [System.Drawing.Drawing2D.CompositingMode]::SourceCopy
$graphics.InterpolationMode = [System.Drawing.Drawing2D.InterpolationMode]::HighQualityBicubic
$graphics.DrawImage($image, 0, 0, $width, [int]$height)
} finally {
$graphics.Dispose()
}
$imageToSave = $resizedImage
}
$baseFileName = $fileName.Substring(0, $fileName.Length - 4)
$suffixes = $null
$suffixIndex = 0
while ($true) {
$filePath = Join-Path $MediaFolder $fileName
$savePath = $ExecutionContext.SessionState.Path.GetUnresolvedProviderPathFromPSPath($filePath)
try {
$stream = [System.IO.File]::Open($savePath, [System.IO.FileMode]::CreateNew, [System.IO.FileAccess]::Write)
break
} catch [System.IO.IOException] {
if (-not (Test-Path -LiteralPath $filePath)) {
throw
}
if ($null -eq $suffixes) {
$suffixes = @(0..9999 | Get-Random -Count 10000)
}
if ($suffixIndex -ge $suffixes.Count) {
throw "No available four-digit suffix for '$baseFileName.png'."
}
$fileName = "{0}-{1:D4}.png" -f $baseFileName, $suffixes[$suffixIndex++]
}
}
try {
$imageToSave.Save($stream, [System.Drawing.Imaging.ImageFormat]::Png)
} finally {
$stream.Dispose()
}
} finally {
if ($null -ne $resizedImage) {
$resizedImage.Dispose()
}
$image.Dispose()
}
# Output Markdown syntax
$markdown = "

